Charpy Impact Testing
CHARPY IMPACT TESTING
- Materials Testing
- CHARPY IMPACT TESTING
- CHEMICAL ANALYSIS LAB
- FAILURE ANALYSIS LAB
- FASTENER TESTING
- HARDNESS AND MICRO-HARDNESS TESTING
- HEAT TREATMENT SUPPORT
- MAGNETIC PARTICLE INSPECTION
- MECHANICAL TESTING
- METALLURGICAL TESTING LAB
- MICROSTRUCTURE ANALYSIS
- POLYMER TESTING
- SALT FOG TESTING
- SEM/EDS LAB
- SURFACE FINISH CONSULTING
- TENSILE TESTING LAB

TRUST QAI’S TEAM OF EXPERTS FOR TESTING METALS AND METAL COMPONENTS FOR CRITICAL ENGINEERING APPLICATIONS.
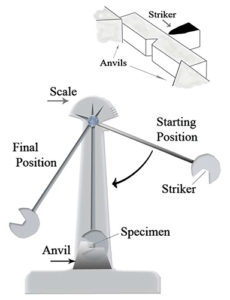
Charpy Impact Testing measures the amount of energy absorbed during fracture of a specimen to determine its Ductile to Brittle Transition Temperature (DBTT), which can be graphed in our report. Testing includes sample preparation of three specimens per test and is used primarily for steels which exhibit temperature dependent behavior relating to toughness of the material at high strain. This toughness is typically related to direction of the rolling or grain flow of a forging. Materials are usually tougher along the direction of rolling and not as tough across the direction of rolling.
This type of testing is often specified in welding codes for pressure vessels, valves and fittings used in the oil and gas industry, related piping, pipelines, outdoor structures, hi-rise buildings, towers, bridges, agricultural vehicles, industrial equipment, and other critical building, infrastructure, and engineering applications.
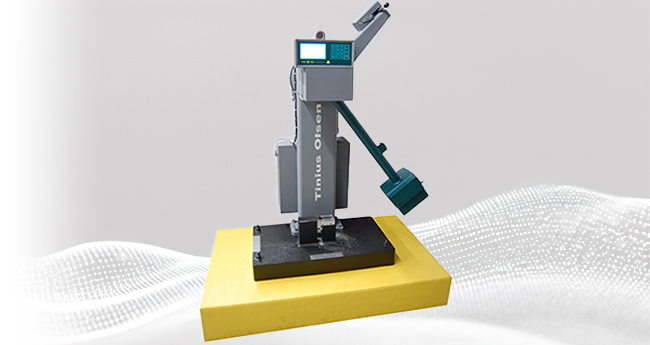
At QAI, we take pride in offering timely and personalized customer services alongside our rigorous mechanical testing. Our independent, accredited mechanical test lab ensures that Charpy Impact Testing is conducted daily, adhering to ASTM A370/E23 standards. With our two high capacity pendulum impact testers and cutting-edge sample preparation methods, we guarantee accurate results regardless of part size or hardness. Moreover, our 16 cutting machines, ranging from high-speed diamond saws to a substantial double column band saw, enable us to accommodate various materials and dimensions with ease. It can cut 40″ by 40″ part.
Experience the difference of our dedicated approach, where timely results and tailored assistance are at the forefront of our commitment to excellence.
Specimens needed for Charpy Impact Testing are normally cut from the actual part or weldments using an abrasive cut off saw or a band saw with low heat input. Base metal specimen is 55 mm (about 2.25″ inches) in length, 10 mm thick and 10 mm wide.
Centerline of the Charpy specimen is notched according to standard with a special broach to create the required V-Notch with the appropriate dimensions and surface finish. Sub-size specimens can be made with 7.5 mm x 10 mm or 5 mm x 10 mm or 2.5 mm x 10 mm. Threaded fasteners and pipe have special considerations. Specimens are tested either at room temperature or at a specified temperature, such as -20ºC, -10ºC, 0ºC, +10ºC, +20ºC.

Highlights
SPECIFIC TESTS AND/OR PROPERTIES MEASURED
METAL AND METALLIC COMPONENTS
TEST METHODS
Notched Bar Impact (Charpy Full Size and Sub-Size Samples)
APPLICABLE STANDARDS
ASTM E23
KEY EQUIPMENT OR TECHNOLOGY
Charpy Pendulum Impact Tester
For more information about our services please contact us at:
📞 USA 888.540.4024 📞 CANADA 877.461.8378

Founded in 1995 by a group of experienced certification and testing experts, QAI is an independent third-party testing, inspection and certification organization which serves the building industry, government and individuals with cost effective solutions through our global, in-house capabilities / services.
Latest News
-
Join QAI’s Impartiality Committee!
Be the Voice of Impartiality – Join QAI’s Impartiality Committee! Are you
19 December, 2024 -
2023 Alberta Edition of the National Building Code
Dear Valued Client, Subject: Announcing the publication of the 2023 Alberta Edition
5 April, 2024 -
QAI LABORATORIES (QAI) AND ATRONA TEST LABS (ATL) JOIN FORCES TO EXPAND TESTING CAPABILITY
QAI Laboratories is pleased to announce the acquisition of ATRONA Test Labs,
18 March, 2024
Services
Contact
 USA 1(888)540.4024
 Canada 1(877)461.8378
 Europe info@qai.org
 China china-info@qai.org
 S Korea asia-info@qai.org


